
Translation of original operating instructions V4.0 clublinerTM | clublinerTM plus


© mariner 3S www.mariner-3s.com www.mariner-3s.com
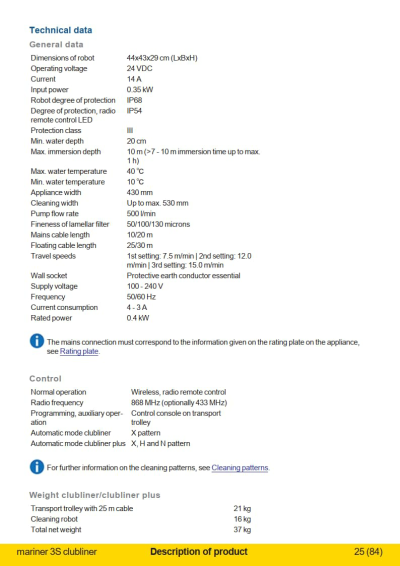
TOC Foreword 5 Purpose of this document 6 Quality control 7 Warranty 7 CE declaration of conformity 7 Safety instructions 8 General safety instructions 10 Additionally used symbols 10 Responsibilities 11 Responsibilities of the manufacturer: 11 Responsibilities of the owner: 11 Correct use 12 Foreseeable misuse 12 Description of product 13 General 14 Manufacturer 14 Overview clubliner and clubliner plus 15 Rating plate 16 Robot rating plate 16 Transport trolley rating plate 16 Controls 17 Overview of buttons on the control console 18 Menu navigation buttons 18 Display 19 Ready for operation 19 In cleaning mode (automatic operation) 19 Radio remote controls 20 Radio remote control with LED 20 Battery status LED 20 Cleaning patterns 21 X cleaning pattern 21 H and N cleaning patterns 21 Direction switching 21 Definition of terms related to operation 23 Movement in a straight line 23 Start delay 23 Track offset 23 Increasing the cleaning efficiency 23 Filtering/ flow schematic 24 Ventilation 24 Cleaning time 24 Wall cleaning 24 Technical data 25 General data 25 Control 25 Weight clubliner/clubliner plus 25 Cleaning 26 Checks before cleaning 27 Preparing cleaning robot 28
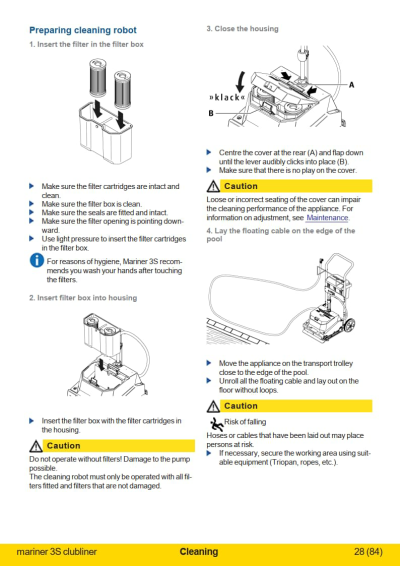
- Insert the filter in the filter box 28
- Insert filter box into housing 28
- Close the housing 28
- Lay the floating cable on the edge of the pool 28
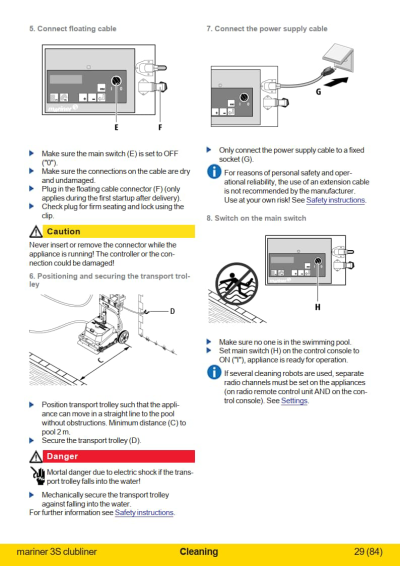
- Connect floating cable 29
- Positioning and securing the transport trolley 29
- Connect the power supply cable 29
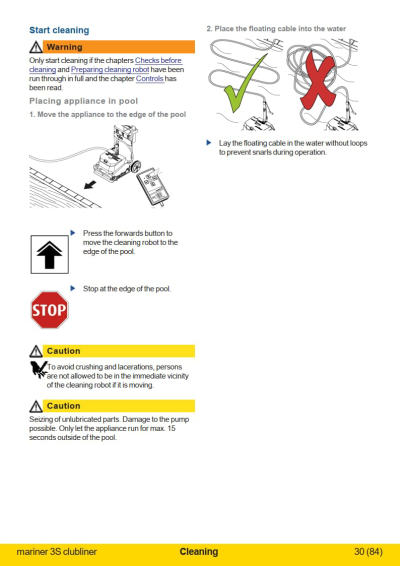
- Switch on the main switch 29 Start cleaning 30 Placing appliance in pool 30
- Move the appliance to the edge of the pool 30
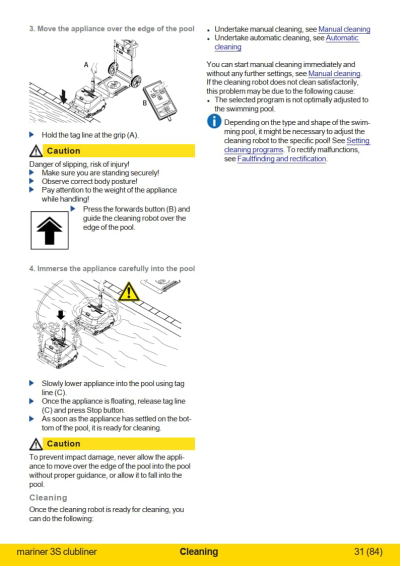
- Place the floating cable into the water 30
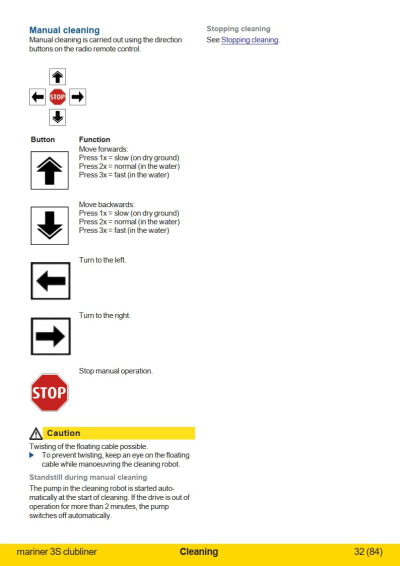
- Move the appliance over the edge of the pool 31
- Immerse the appliance carefully into the pool 31 Cleaning 31 Manual cleaning 32
 mariner 3S clubliner 1 (84)
Standstill during manual cleaning 32 Stopping cleaning 32 Automatic cleaning 33
- Clarify the program sequence 33
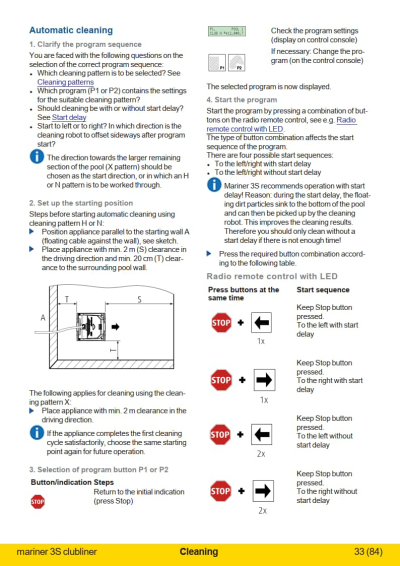
- Set up the starting position 33
- Selection of program button P1 or P2 33
- Start the program 33 Radio remote control with LED 33
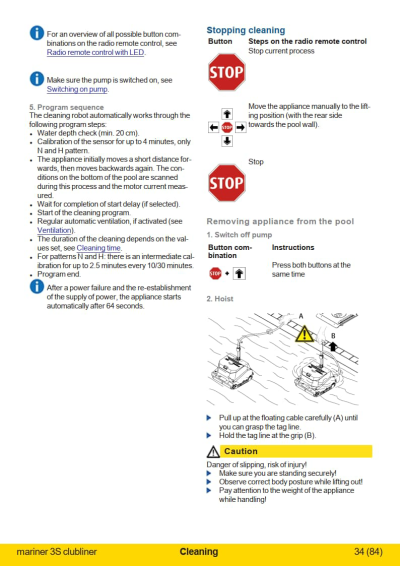
- Program sequence 34 Stopping cleaning 34 Removing appliance from the pool 34
- Switch off pump 34
- Hoist 34
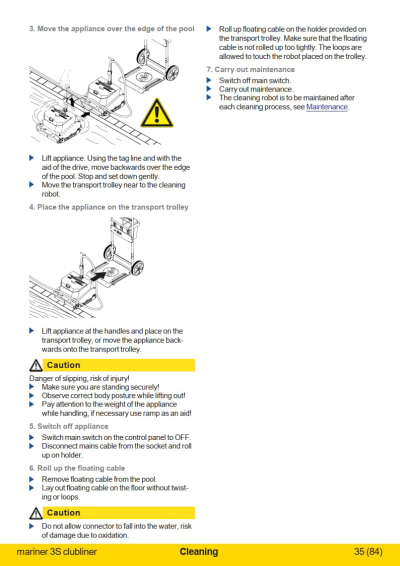
- Move the appliance over the edge of the pool 35
- Place the appliance on the transport trolley 35
- Switch off appliance 35
- Roll up the floating cable 35
- Carry out maintenance 35 Settings 36 Menu structure and navigation 37 Menu navigation buttons 37 Main indications 38 Version indication 38 Operating hours and cycle indication 38 Cleaning program indication 38 Auxiliary operation 39 Manual operation 39 Auto operation 39 Pump 39 General settings 40 LCD contrast 40 Language 40 Radio channel setting 40 Setting radio channel, radio remote control with LED 41 Cleaning program parameters 41 Pool 42 Pool name 42 Start delay 42 Cleaning time 42 Cleaning pattern 42 Speed 43 Ventilation 43 Liner program 43 Pump performance 43 Pump reduction 43 Direction switching at obstacles 43 Direction switching current 44 Delayed direction switching current 44 Direction switching shock 44 Track offset 44 Calibration 45 Alignment rear 45 Alignment front 45 Rotation distance front 45 Rotation distance rear 45 Direction switching inclination 46 Highest inclination offset manoeuvre 46 Speed boost 46 Maximum track length 46 Track length / time 46 Status display 47 Status messages 47
- Status 47 Delete status messages 47 Resetting data 48 Reset default 48 Controller versions 49
 mariner 3S clubliner 2 (84)
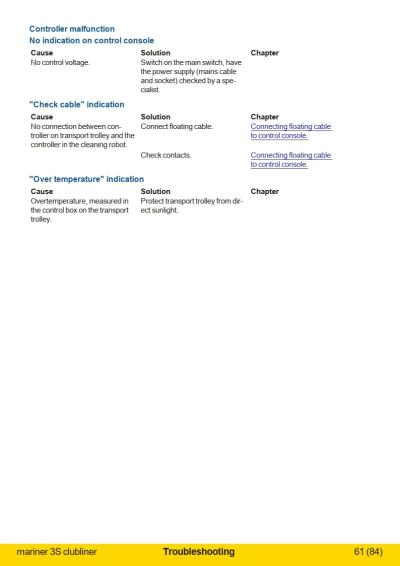
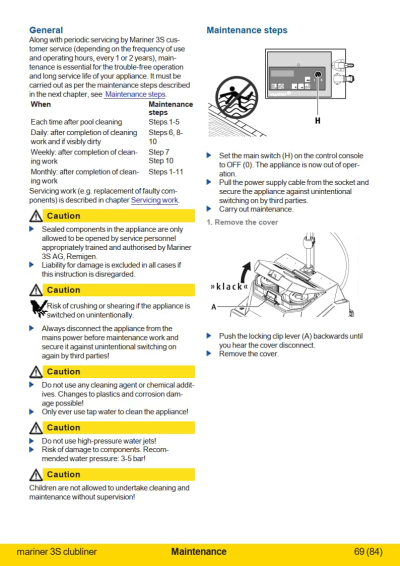
Version 49 Controller version, control console, transport trolley 49 Robot controller version 49 Gyro version indication 49 Pump controller version 49 Drive motor controller version 49 Factory settings 50 Troubleshooting 52 Usage in auxiliary operation 54 Manual cleaning using auxiliary operation 54 Overview of assignment of the buttons 54 Automatic cleaning using auxiliary operation 55 Faultfinding and rectification 56 Radio remote control malfunction 57 Drive malfunction 58 Manoeuvring malfunction 58 Appliance does not move 58 Appliance moves in circles 58 Standstill during cleaning 58 Deviation on movement in straight line (H, N) 58 Cleaning malfunction 59 Immersing malfunction 59 Cleaning result malfunction 59 Dirt in joints 59 Appliance causes a cloud of dirt 59 Suction performance malfunction 59 Drive malfunction in liner pool 60 Controller malfunction 61 No indication on control console 61 "Check cable" indication 61 "Over temperature" indication 61 Direction switching malfunction 62 Direction switching position error 62 Direction switching fault despite wall contact 62 Track length error 62 Inclination error 62 Status messages on the control console 63 100-104 pump controller 63 110-114 left motor controller 63 115-119 right motor controller 64 123 direction sensor (clubliner plus) 64 140-145 abort codes N cleaning pattern 65 160-167 abort codes H cleaning pattern 66 181-191 general status messages 67 Maintenance 68 General 69 Maintenance steps 69
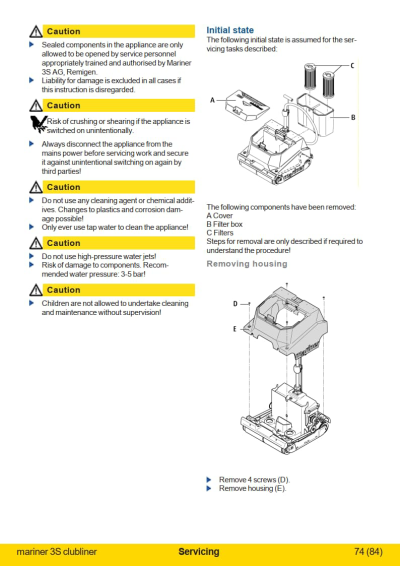
- Remove the cover 69
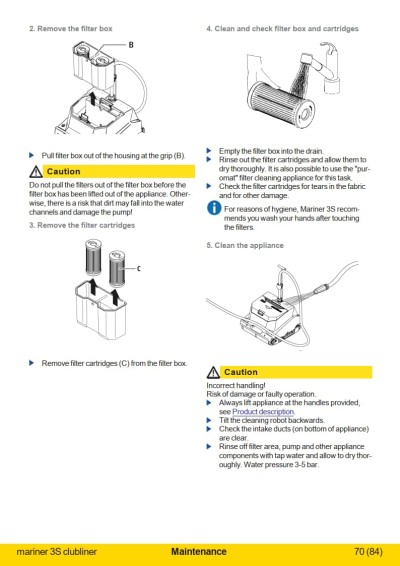
- Remove the filter box 70
- Remove the filter cartridges 70
- Clean and check filter box and cartridges 70
- Clean the appliance 70
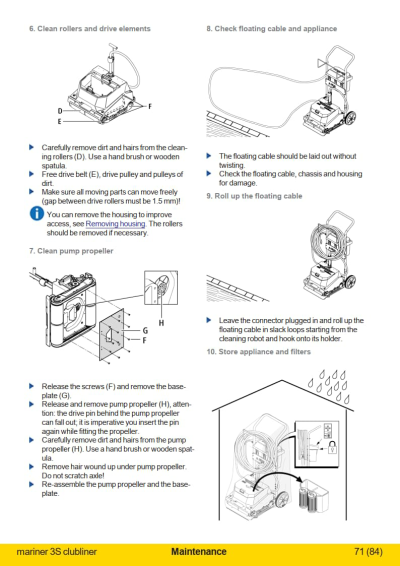
- Clean rollers and drive elements 71
- Clean pump propeller 71
- Check floating cable and appliance 71
- Roll up the floating cable 71
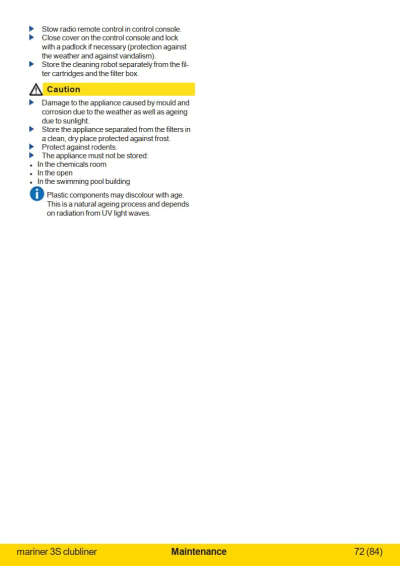
- Store appliance and filters 71 Servicing 73 Initial state 74 Removing housing 74 Replacing contact bar 75 Assembly 75 Replacing drive belt 75
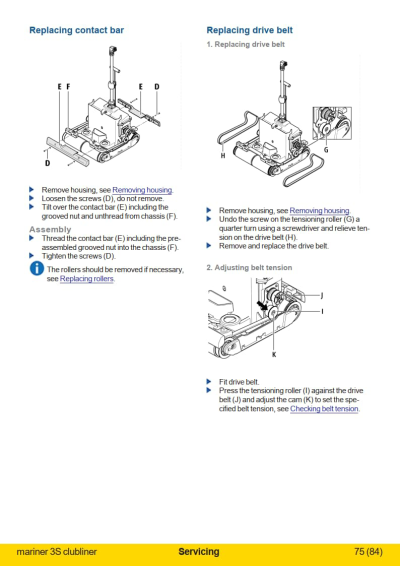
- Replacing drive belt 75
- Adjusting belt tension 75 Checking belt tension 76 Replacing rope 76
 mariner 3S clubliner 3 (84)
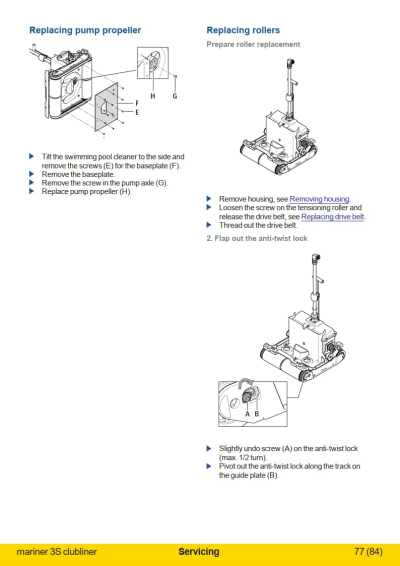
Assembly 76 Replacing pump propeller 77 Replacing rollers 77 Prepare roller replacement 77
- Flap out the anti-twist lock 77
- Remove the rollers 78
- Install rollers 78
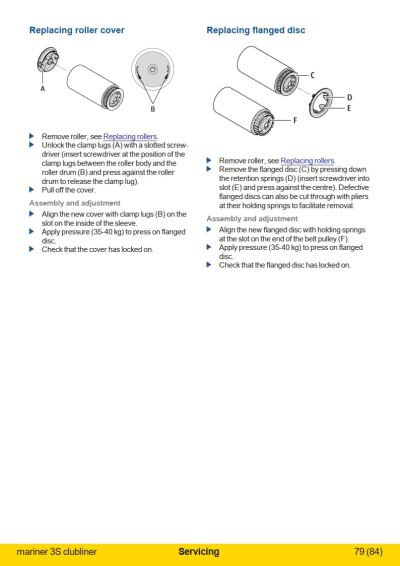
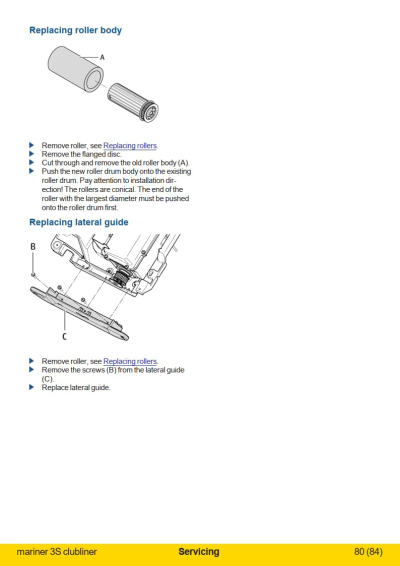
- Flap in the anti-twist lock 78 Replacing roller cover 79 Assembly and adjustment 79 Replacing flanged disc 79 Assembly and adjustment 79 Replacing roller body 80 Replacing lateral guide 80 Decommissioning 81 Returning the product 82 Recycling 82 Spare parts 83
 mariner 3S clubliner 4 (84)

Foreword

 mariner 3S clubliner Foreword 5 (84)
Thank you for placing your confidence in one of our top quality products. We hope you will be very satisfied with the performance of your new appliance. Read these operating instructions carefully before starting work with the cleaning robot. Make sure they are understood by all persons working with the appliance.
Purpose of this document
These operating instructions are intended to ensure safe and error-free commissioning, operation and maintenance of your cleaning robot. If you follow
the instructions in these operating instructions, your appliance will operate to your perfect satisfaction and also have a long service life. Before operating, make sure an internet connection is available or download the PDF version of the operating instructions.
 mariner 3S clubliner Foreword 6 (84)


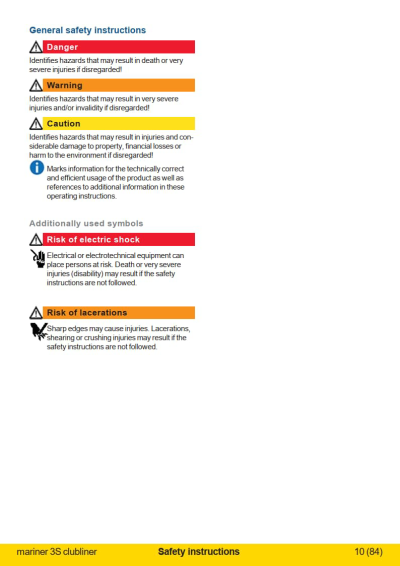
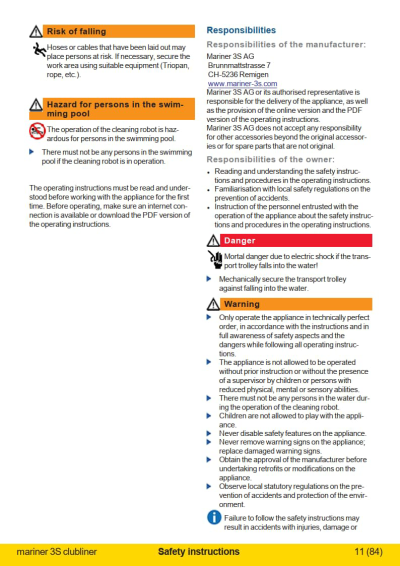
Safety instructions

 mariner 3S clubliner Safety instructions 8 (84)

InfoText
Mariner 3S appliances are constructed to the state-of-the-art and are safe to use. The general safety instructions in this chapter inform
you of possible remaining risks that permanently exist even if the cleaning robot clubliner/clubliner plus is used correctly, or that might occur unexpectedly.
 mariner 3S clubliner Safety instructions 9 (84)

Description of product

 mariner 3S clubliner Description of product 13 (84)
Overview clubliner and clubliner plus
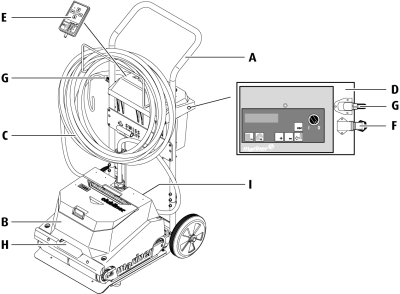
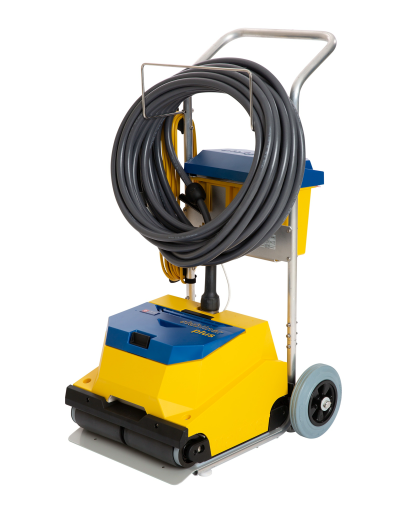
A Transport trolley B Cleaning robot C Floating cable with tag line D Control box with control console E Radio remote control F Connection for floating cable G Power supply cable H Handle I Handle
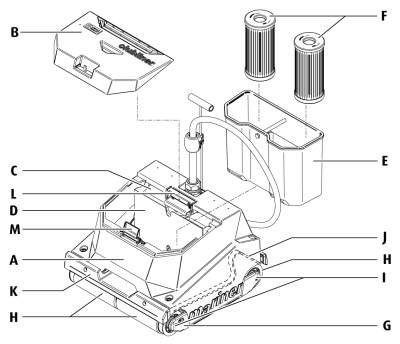
A Housing B Housing cover C Control and drive unit D Shielding plate E Filter box F Filter cartridges G Lateral guide H Cleaning rollers I Roller axles J Drive belt K Contact bar L Cover mount M Locking clip
 mariner 3S clubliner Description of product 15 (84)
Rating plate Robot rating plate
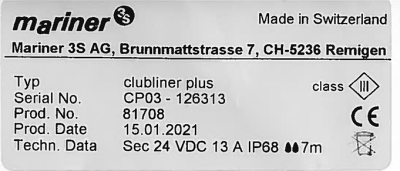
Transport trolley rating plate

 mariner 3S clubliner Description of product 16 (84)
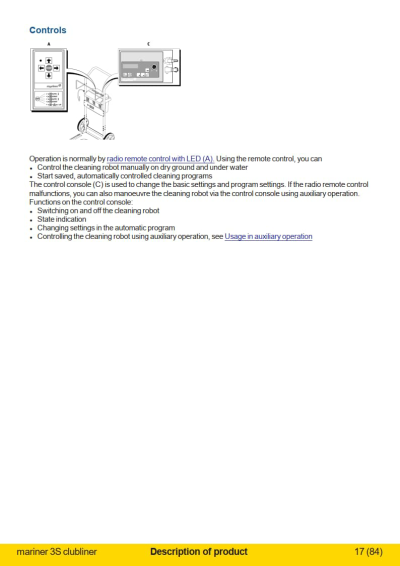
Overview of buttons on the control console
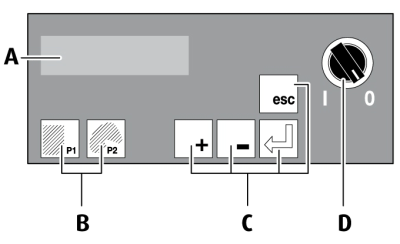
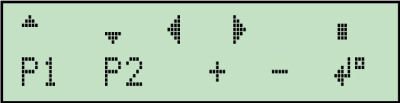
A Display B Program selection buttons C Menu navigation buttons D Main switch (0= OFF, I= ON) Menu navigation buttons Symbol Meaning
 Program selection button P1
Selects the cleaning program saved in P1, which is defined via the menu item Pool 1. clubliner plus: if the button is pressed for 5 seconds, the program saved in P3 is selected.
Program selection button P1
Selects the cleaning program saved in P1, which is defined via the menu item Pool 1. clubliner plus: if the button is pressed for 5 seconds, the program saved in P3 is selected.
 Program selection button P2
Selects the cleaning program saved in P2, which is defined via the menu item Pool 2. clubliner plus: if the button is pressed for 5 seconds, the program saved in P4 is selected.
Program selection button P2
Selects the cleaning program saved in P2, which is defined via the menu item Pool 2. clubliner plus: if the button is pressed for 5 seconds, the program saved in P4 is selected.
 Plus button
Navigates downwards between the menu items in a menu level or changes values.
Plus button
Navigates downwards between the menu items in a menu level or changes values.
 Minus button
Navigates upwards between the menu items in a menu level or changes values.
Minus button
Navigates upwards between the menu items in a menu level or changes values.
 Escape button
Leaves the current menu level without saving.
Escape button
Leaves the current menu level without saving.
 Enter button
Moves to the next menu level or saves the setting.
Enter button
Moves to the next menu level or saves the setting.
 mariner 3S clubliner Description of product 18 (84)
Display Ready for operation
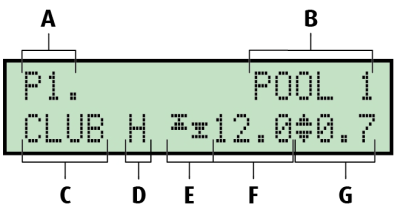
In cleaning mode (automatic operation)
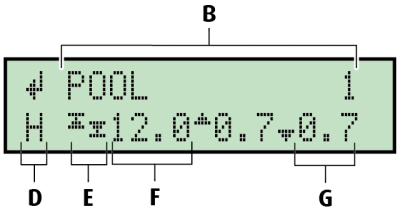
A Cleaning program B Pool name C Appliance model D Cleaning pattern set (H, N or X) E "Alignment" function activated F Cleaning speed set G Turning position from pool wall
 mariner 3S clubliner Description of product 19 (84)

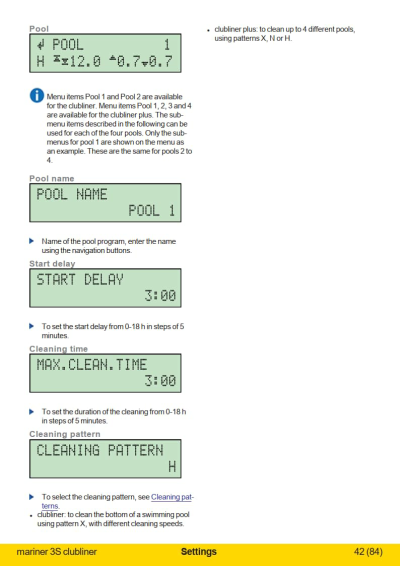
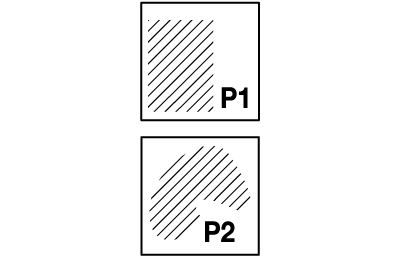
Cleaning patterns X cleaning pattern The X cleaning pattern controls the cleaning robot in a cross-shaped cleaning pattern and is therefore suitable for irregular pool shapes (even with depressions). Normally, no specific settings are required for this cleaning pattern. H and N cleaning patterns These cleaning patterns function based on the track by track principle. They control the cleaning robot back and forwards on a straight track. The track offset between the tracks is adjustable. Both must be set specifically. Pool depressions should be avoided.
 If possible, clean parallel to the shorter side of the pool. Reason: the shorter the cleaning paths, the more exact the movement is in a straight line.
InfoText
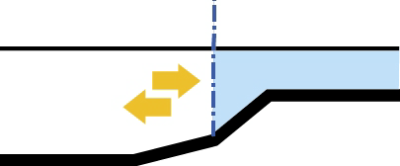
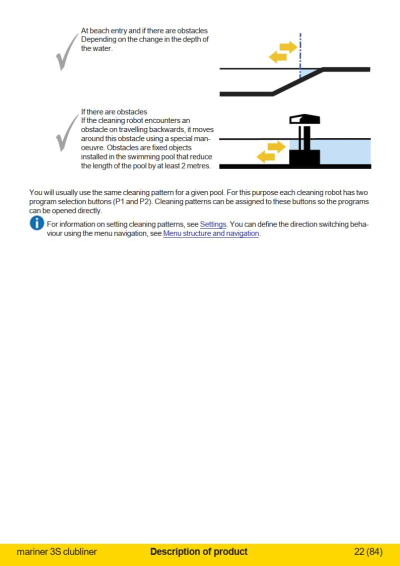
Direction switching The cleaning robot switches direction on its own in automatic operation. This always occurs if one of the following direction switching conditions is met: X N, H Direction switching condition Sketch On contact with the wall


 Depending on the magnitude of the shock or current consumption of the motor.
Via track length


 Depending on the distance travelled (max. track length).
Before inclination downward
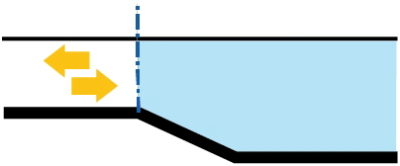
 Before diving areas or other deeper areas, the appliance automatically switches direction.
On inclines

 Depending on the angle set, which is not allowed to be exceeded.
 mariner 3S clubliner Description of product 21 (84)
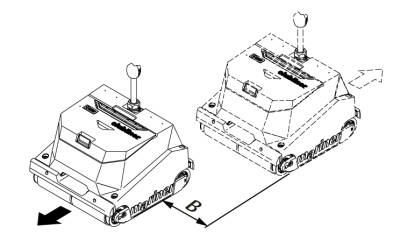
Definition of terms related to operation Movement in a straight line Deviations on the direction of the appliance from the track in cleaning patterns H and N can have various causes: l Quality of the bottom of the pool l Evenness or inclination of the bottom of the pool l Dirt and wear on the rollers l Clogged filters l Wear and dirt on the drive elements For sources of errors and how to rectify them, see Troubleshooting. During operation with cleaning pattern X, movement in a straight line does not need to be taken into account. Start delay If the start delay is activated in the cleaning pattern, the cleaning robot waits for a specifically defined time before starting the cleaning process. Track offset In cleaning patterns H and N, the cleaning robot offsets each of its tracks by a specifically adjustable track offset (B).
Increasing the cleaning efficiency Moving water reduces the cleaning efficiency of the appliance. The efficiency is increased considerably if dirt particles can sink to the bottom of the pool in still water before starting the cleaning process. For this reason, the controller for the cleaning robot is equipped with the "start delay" function.
 mariner 3S clubliner Description of product 23 (84)

Cleaning

 mariner 3S clubliner Cleaning 26 (84)

Settings
 mariner 3S clubliner Settings 36 (84)
Menu structure and navigation
 The appliance's software is described in this chapter. You can read the version of the software for the remote, robot, gyro, pump and motor on the related version screen.
InfoText
 You can change appliance settings and settings for the automatic cleaning patterns on the control console.
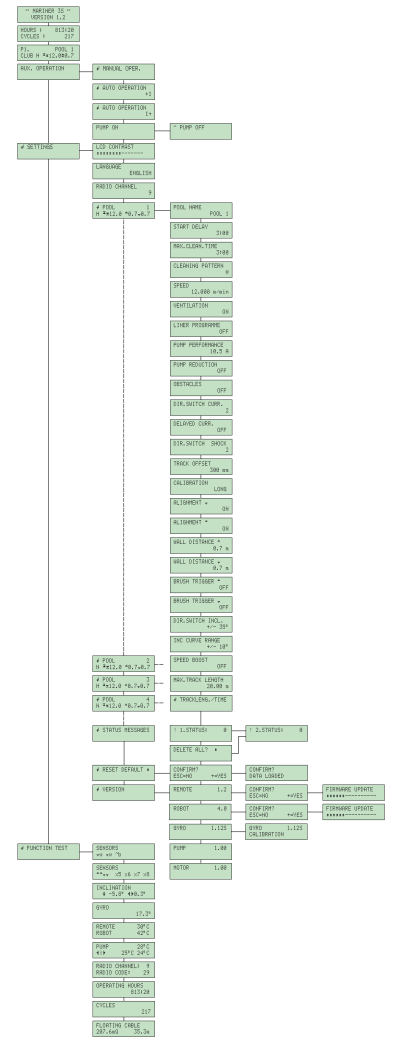
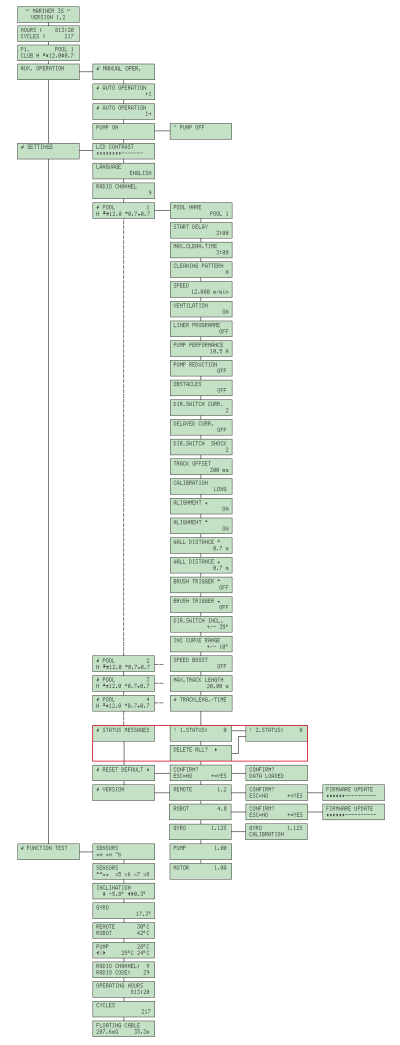
Use the menu structure in the appliance's software shown below on changing settings. The menu structure is divided into various levels.
The further to the right you move within this structure, the deeper you go into the menu. With each change in level you can therefore make more detailed settings. Each menu item corresponds to one adjustable appliance parameter.
Each setting is explained in the following chapters. An overview shows where you are in the menu structure.
You can change appliance settings and settings for the automatic cleaning patterns on the control console.
Use the menu structure in the appliance's software shown below on changing settings. The menu structure is divided into various levels.
The further to the right you move within this structure, the deeper you go into the menu. With each change in level you can therefore make more detailed settings. Each menu item corresponds to one adjustable appliance parameter.
Each setting is explained in the following chapters. An overview shows where you are in the menu structure.
Menu navigation buttons Symbol Meaning
 Program selection button P1
Selects the program saved in P1, which you define via the menu item Pool 1 or Pool 3.
Program selection button P1
Selects the program saved in P1, which you define via the menu item Pool 1 or Pool 3.
 Program selection button P2
Selects the program saved in P2, which you define via the menu item Pool 2 or Pool 4.
Program selection button P2
Selects the program saved in P2, which you define via the menu item Pool 2 or Pool 4.
 mariner 3S clubliner Settings 37 (84)
 Plus button
Navigates downwards between the
Plus button
Navigates downwards between the
menu items in a menu level or changes values.
 Minus button
 Navigates upwards between the menu items in a menu level or changes values. Escape button
Leaves the current menu level without saving.
Navigates upwards between the menu items in a menu level or changes values. Escape button
Leaves the current menu level without saving.
 Enter button
Moves to the next menu level or saves the setting.
Enter button
Moves to the next menu level or saves the setting.
Main indications Version indication

 Initial indication after switching on the control console, the remote controller version is indicated.
CaretText
Initial indication after switching on the control console, the remote controller version is indicated.
CaretText
Operating hours and cycle indication

 This indication is displayed approx. 5 seconds after the initial indication. The number of operating hours for manual and automatic operation are displayed. One cycle corresponds to automatic operation for at least 15 minutes without interruption.
CaretText
This indication is displayed approx. 5 seconds after the initial indication. The number of operating hours for manual and automatic operation are displayed. One cycle corresponds to automatic operation for at least 15 minutes without interruption.
CaretText
Cleaning program indication

 Indication of the cleaning program activated and its parameters
CaretText
Indication of the cleaning program activated and its parameters
CaretText
 For information on the symbols, see Display.
InfoText
 mariner 3S clubliner Settings 38 (84)
General settings LCD contrast

 To change the contrast setting on the LCD display.
CaretText
Language
To change the contrast setting on the LCD display.
CaretText
Language


 To select display language: German, French, Italian, English, Spanish, Danish or Dutch.
CaretText
Radio channel setting
To select display language: German, French, Italian, English, Spanish, Danish or Dutch.
CaretText
Radio channel setting

 To change the radio channel for the control console, factory setting is channel 9!
CaretText
To change the radio channel for the control console, factory setting is channel 9!
CaretText
 Only change the factory setting if several cleaning robots are used at the same location and at the same time.
InfoText

InfoText
The same channels must be set on the control console and the radio remote control!

InfoText
To set the radio channel on the radio remote control, see next chapter.
 mariner 3S clubliner Settings 40 (84)
Setting radio channel, radio remote control with LED
 Keep button combination pressed for 5 seconds to change to the channel selection mode. Count the flashes on the LED display. The number of flashes corresponds to the number of the channel set. You are now in the channel selection mode.
 To select the next-higher radio channel: press "right" arrow button 1x.
 To select the next-lower radio channel: press "left" arrow button 1x.
 To save the current radio channel and leave the mode.
Cleaning program parameters

 mariner 3S clubliner Settings 41 (84)
Speed

 To set speed from 7.5 15 m/min in steps of 0.375 m/min.
CaretText
To set speed from 7.5 15 m/min in steps of 0.375 m/min.
CaretText
 If possible, do not set speed higher than 12 m/min.
CaretText
Ventilation
If possible, do not set speed higher than 12 m/min.
CaretText
Ventilation


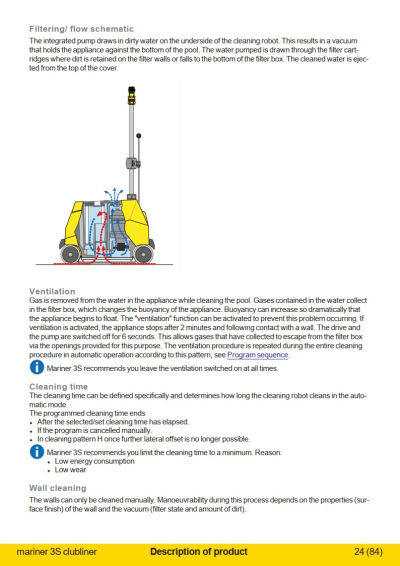
 To switch on/off ventilation, see Ventilation. Mariner 3S recommends you leave the vent
InfoText
CaretText ilation switched on at all times. Liner program

 To switch on/off the liner program. Pump performance
CaretText
To switch on/off the liner program. Pump performance
CaretText

 To set pump performance, 7.5 10.5 A. Pump reduction
CaretText
To set pump performance, 7.5 10.5 A. Pump reduction
CaretText

 To set pump current to OFF or for special situations, 5.0 10.0 A.
CaretText
To set pump current to OFF or for special situations, 5.0 10.0 A.
CaretText
Direction switching at obstacles

 To set moving around obstacles to OFF or number of avoidance manoeuvres for moving around obstacles (1-6).
CaretText
To set moving around obstacles to OFF or number of avoidance manoeuvres for moving around obstacles (1-6).
CaretText
 mariner 3S clubliner Settings 43 (84)
Calibration Only relevant for clubliner plus.

 To set the calibration interval to short, middle or long.
CaretText
To set the calibration interval to short, middle or long.
CaretText
 Mariner 3S recommends you set the calibration interval as long as possible. The shorter the calibration interval, the less exact the movement is in a straight line.
InfoText
Alignment rear

 To switch alignment at rear ON/OFF/SECTION/0:05-18:00/ALWAYS. Only relevant for clubliner plus.
CaretText
Alignment front
To switch alignment at rear ON/OFF/SECTION/0:05-18:00/ALWAYS. Only relevant for clubliner plus.
CaretText
Alignment front

 To switch alignment at front ON/OFF/0:0518:00/ALWAYS. Only relevant for clubliner plus.
CaretText
Rotation distance front
To switch alignment at front ON/OFF/0:0518:00/ALWAYS. Only relevant for clubliner plus.
CaretText
Rotation distance front

 To set rotation distance from the front wall to 0.30 5.0 m in steps of 0.10 m, only relevant for clubliner plus.
CaretText
To set rotation distance from the front wall to 0.30 5.0 m in steps of 0.10 m, only relevant for clubliner plus.
CaretText
 Rotation distance rear
 To set rotation distance from the rear wall to 0.30 5.0 m in steps of 0.10 m, only relevant for clubliner plus.
CaretText
To set rotation distance from the rear wall to 0.30 5.0 m in steps of 0.10 m, only relevant for clubliner plus.
CaretText
 mariner 3S clubliner Settings 45 (84)
Status display Status messages

 Open state 1. Status
CaretText
Open state 1. Status
CaretText

 To open 1st status message. To open further status messages if available, the last 20 status messages are saved.
CaretText
Delete status messages
To open 1st status message. To open further status messages if available, the last 20 status messages are saved.
CaretText
Delete status messages

 Delete status messages, for this purpose keep Enter button pressed for 5 s.
CaretText
Delete status messages, for this purpose keep Enter button pressed for 5 s.
CaretText
 mariner 3S clubliner Settings 47 (84)
Resetting data Reset default

 The parameters for the cleaning programs are reset to the factory setting.
CaretText
The parameters for the cleaning programs are reset to the factory setting.
CaretText


 mariner 3S clubliner Settings 48 (84)
Controller versions Version

 To display controller version and to update if necessary.
CaretText
To display controller version and to update if necessary.
CaretText
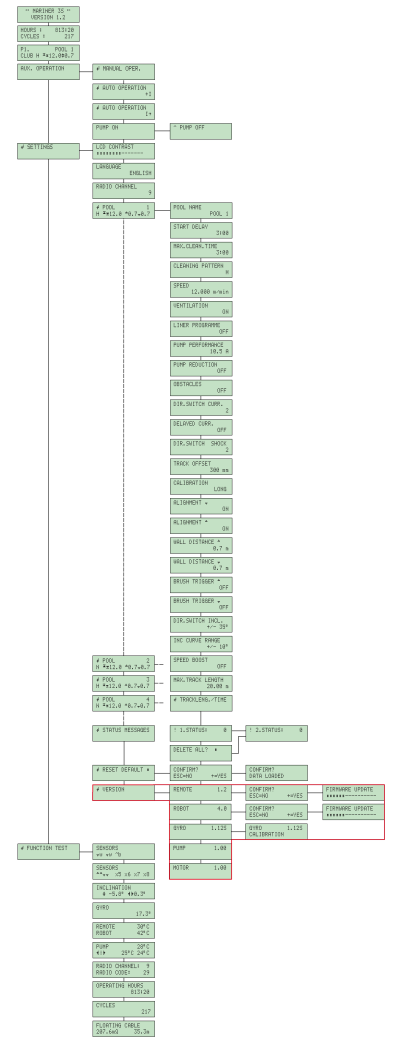 Controller version, control console, transport trolley

 Version indication for the remote controller (controller in the control console). To initiate remote controller update (only from version 2.0).
CaretText
Robot controller version
Version indication for the remote controller (controller in the control console). To initiate remote controller update (only from version 2.0).
CaretText
Robot controller version

 Version indication for the robot controller. To initiate robot controller update.
CaretText
Gyro version indication
Version indication for the robot controller. To initiate robot controller update.
CaretText
Gyro version indication

 Version indication for the compass software Pump controller version
CaretText
Version indication for the compass software Pump controller version
CaretText

 Version indication for the pump controller Drive motor controller version
CaretText
Version indication for the pump controller Drive motor controller version
CaretText

 Version indication for the drive motor controller
CaretText
Version indication for the drive motor controller
CaretText
 mariner 3S clubliner Settings 49 (84)

Factory settings

 mariner 3S clubliner Factory settings 50 (84)
Function clubliner clubliner plus


 Pool name POOL
1
Press P2 for 5 sec
Start delay h 3 01:30 3 3 3 3
Cleaning time h 3 3 3 3 3 3
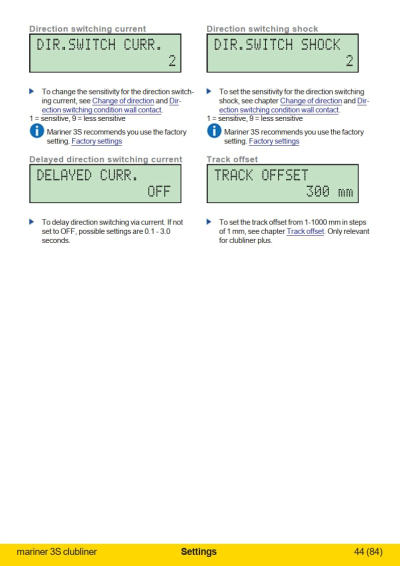
Cleaning pattern X X H N H N Speed m/min 12 12 12 12 12 12 Ventilation ON ON ON ON ON ON Liner program OFF OFF OFF OFF OFF OFF Pump performance A 10.5 10.5 10.5 10.5 10.5 10.5 Pump reduction A OFF OFF OFF OFF OFF OFF Moving around obstacles - - OFF OFF OFF OFF Direction switching current 2 2 2 2 2 2
Delayed current OFF OFF OFF OFF OFF OFF Direction switching shock 2 2 2 2 2 2
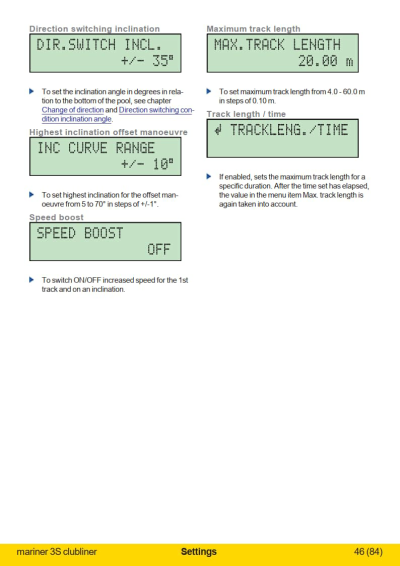
Track offset mm - - 300 300 300 300 Calibration - - LONG LONG LONG LONG Alignment front/rear - - ON/ON ON/ON OFF/ON OFF/ON Wall distance front/rear m - - 0.7/0.7 0.7/0.7 0.7/0.7 0.7/0.7 Direction switching inclin
ation

 Inclination curve range +/-10° +/-10° +/-10° +/-10° +/-10° +/-10° Speed boost OFF OFF OFF OFF OFF OFF Max. track length m 20 15 20 20 20 20
Max. track length over time
OFF OFF OFF OFF OFF OFF
 mariner 3S clubliner Factory settings 51 (84)

Troubleshooting

 mariner 3S clubliner Troubleshooting 52 (84)

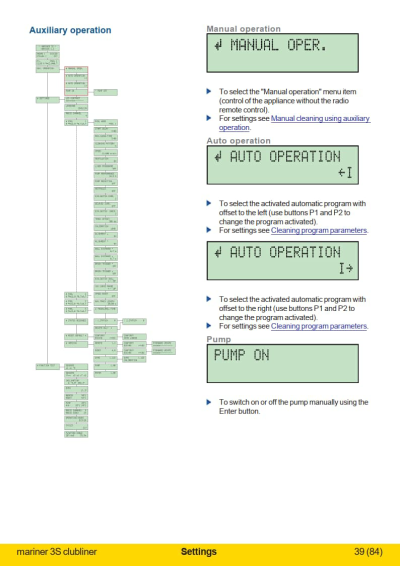
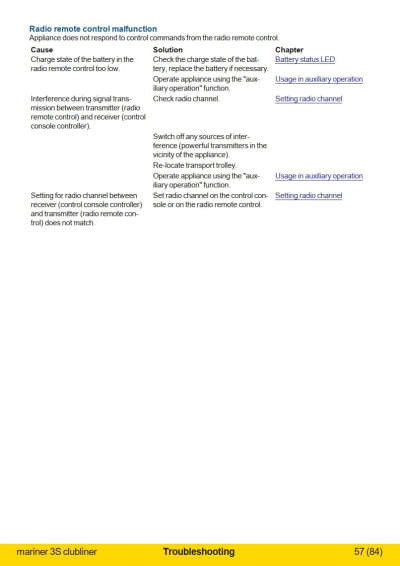
Usage in auxiliary operation If the radio remote control fails, all functions can be selected at the control console. Manual cleaning using auxiliary operation Step Display

 Press Esc button until the initial indication is reached, see right.

 Press Plus button to change to the "Auxiliary oper" menu item.

 Switch to the "Manual operation" menu item of auxiliary operation: Press the enter button twice.
 Manoeuvre manually (assignment of the buttons is displayed).
Overview of assignment of the buttons Symbol Meaning
 To accelerate forwards. To slow down backwards.
 To accelerate backwards. To slow down forwards.
 To turn left.
 To turn right.
 Stop.
Stop.
 Return to the initial indication in the menu structure tree.
 mariner 3S clubliner Troubleshooting 54 (84)
Automatic cleaning using auxiliary operation Step Display

 Press Esc button until the initial indication is reached, see right.

 Select the required program with program selection buttons P1 and P2.

 Press Plus button to change to the "Auxiliary oper" menu item.

 Open "Auxiliary operation" area using Enter button.

 Press Plus button to change to the "Auto operation" menu item.
Offset to left.
Press Plus button to change to the "Auto operation" menu item.
Offset to left.
Press Plus button. Offset to right.


Press Plus button. Pump ON/OFF.


 Press the Enter button once: Start the program with a start delay. Press the enter button twice: Start the program without a start delay.
The cleaning program is now shown on the display.
 mariner 3S clubliner Troubleshooting 55 (84)
Faultfinding and rectification All general errors that are not indicated on the control console are described here.
 mariner 3S clubliner Troubleshooting 56 (84)

Status messages on the control console Errors displayed on the control console are listed here, as well as recurring measures for rectifying errors. Code Measures A Reset:
 On the control console: Press the ESC button
CaretText
On the control console: Press the ESC button
CaretText
 On the radio remote control: Press the STOP button.
CaretText
On the radio remote control: Press the STOP button.
CaretText
 On the control console: Set the main switch to OFF (0)
CaretText
On the control console: Set the main switch to OFF (0)
CaretText
 Wait 5 seconds
CaretText
Wait 5 seconds
CaretText
 On the control console: Set main switch to ON (I)
CaretText
On the control console: Set main switch to ON (I)
CaretText

 B On the control console: Press the ESC button C On the radio remote control: Press the STOP but
CaretText
CaretText
ton.
B On the control console: Press the ESC button C On the radio remote control: Press the STOP but
CaretText
CaretText
ton.
 If the problem persists after carrying out all measures, or if a status message not included in the list is displayed, then contact Mariner 3S service at the representative in your region! To be able to provide you with faster service, please have the following details at hand:
InfoText
l Robot number l All status messages as displayed l An exact description of the position at which the appliance has stopped. 100-104 pump controller

 No. Status title Description Measures
 100 Pump over
CaretText
100 Pump over
CaretText
 temperature.
CaretText
temperature.
CaretText
 CaretText
 CaretText
 CaretText
 CaretText
 CaretText
 110-114 left motor controller


 No. Status title Description Measures
 110 Initialisation
CaretText

 failed.
CaretText
CaretText
112 Water ingress. Water ingress alarm.
Water ingress into drive housing.
failed.
CaretText
CaretText
112 Water ingress. Water ingress alarm.
Water ingress into drive housing.
 Immediately remove appliance from the water. Contact service.
CaretText
Immediately remove appliance from the water. Contact service.
CaretText
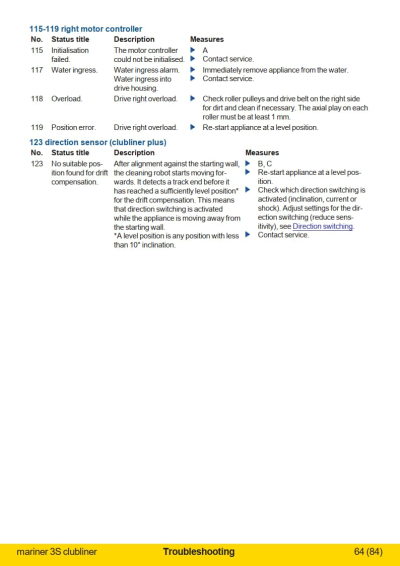
 113 Overload. Drive left overload. Check roller pulleys and drive belt on the left side for
CaretText
dirt and clean if necessary. The axial play on each roller must be at least 1 mm.
113 Overload. Drive left overload. Check roller pulleys and drive belt on the left side for
CaretText
dirt and clean if necessary. The axial play on each roller must be at least 1 mm.
 114 Position error. Drive left overload. Re-start appliance at a level position.
CaretText
114 Position error. Drive left overload. Re-start appliance at a level position.
CaretText
 mariner 3S clubliner Troubleshooting 63 (84)
181-191 general status messages


 No. Status title Description Measures
 181 No water detec
CaretText
ted.
181 No water detec
CaretText
ted.
 Insufficient power supply to the pump. Check appliance's cable-controller
CaretText
connection.
Insufficient power supply to the pump. Check appliance's cable-controller
CaretText
connection.
 Dirt between propeller and pump housing.
CaretText
Dirt between propeller and pump housing.
CaretText

 Pump current consumption < 7 A. Contact service. Unsuitable usage in conjunction with
CaretText
CaretText
 cleaning pattern X.
CaretText
184 No contact with
the wall.
cleaning pattern X.
CaretText
184 No contact with
the wall.
During the last 12 cleaning lanes, the direction was switched due to the maximum track length. No wall contact was detected. The cleaning robot probably is lying on its back or is propped up on an obstruction.
Free the appliance from this position.
 Continue cleaning.
CaretText
Continue cleaning.
CaretText
 Adjust settings for the direction switching using shock sensors and/or current consumption of the drive motors.
CaretText
Adjust settings for the direction switching using shock sensors and/or current consumption of the drive motors.
CaretText
 Check filters for clogging. Clean or replace filters.
CaretText
188 Overtemperature, controller on trans
port trolley.
Check filters for clogging. Clean or replace filters.
CaretText
188 Overtemperature, controller on trans
port trolley.
 Temperature in the control box too high. Protect transport trolley from direct
CaretText
sunlight.
189 Cable test Cable test has produced an out of tol
erance cable length.
Temperature in the control box too high. Protect transport trolley from direct
CaretText
sunlight.
189 Cable test Cable test has produced an out of tol
erance cable length.
190 Wire break Interruption of the ROBOT to REMOTE signal cable
191 Wire break Interruption of REMOTE to ROBOT sig nal cable
 Check connector on the appliance's cable: correctly inserted? Signs of corrosion on the connector?
CaretText
Check connector on the appliance's cable: correctly inserted? Signs of corrosion on the connector?
CaretText
 Contact service.
CaretText
Contact service.
CaretText

 Only plug in or disconnect connector if appliance is switched off. Switch off appliance. Check electrical connection elements.
CaretText
CaretText
Only plug in or disconnect connector if appliance is switched off. Switch off appliance. Check electrical connection elements.
CaretText
CaretText

 Only plug in or disconnect connector if appliance is switched off. Switch off appliance. Check electrical connection elements.
CaretText
CaretText
Only plug in or disconnect connector if appliance is switched off. Switch off appliance. Check electrical connection elements.
CaretText
CaretText
 mariner 3S clubliner Troubleshooting 67 (84)

Maintenance

 mariner 3S clubliner Maintenance 68 (84)

Servicing

 mariner 3S clubliner Servicing 73 (84)
Checking belt tension
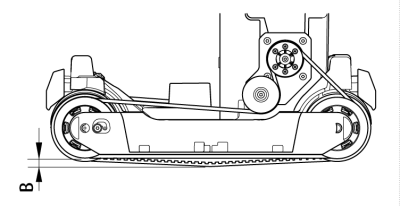
 Check the control dimension (B). If correctly tensioned, the drive belt can be lifted 25 mm from the guide rail with little force.
CaretText
Check the control dimension (B). If correctly tensioned, the drive belt can be lifted 25 mm from the guide rail with little force.
CaretText
Replacing rope
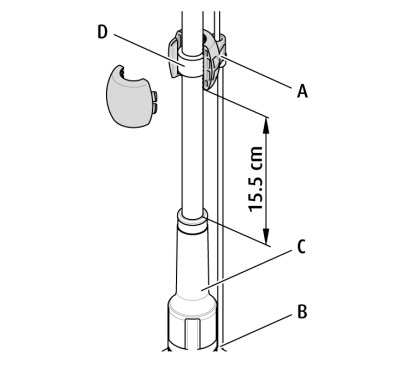
 Open the hose clamp (A) with a slotted screwdriver.
CaretText
Open the hose clamp (A) with a slotted screwdriver.
CaretText
 Cut through and remove the old tag line.
CaretText
Assembly
Cut through and remove the old tag line.
CaretText
Assembly
 Insert the end of the new rope through the hole
CaretText
in the floating cable thread connection (B) below the bend protection (C) on the appliance and secure it from slipping through with a knot at the end.
Insert the end of the new rope through the hole
CaretText
in the floating cable thread connection (B) below the bend protection (C) on the appliance and secure it from slipping through with a knot at the end.
 Position the clamping piece (D) inside of the hose support with eye at a distance of 17 cm to the end of the bend protection. Clamp the end of the hose clamp (A) at a distance of 15.5 cm from the end of the bend protection.
CaretText
Position the clamping piece (D) inside of the hose support with eye at a distance of 17 cm to the end of the bend protection. Clamp the end of the hose clamp (A) at a distance of 15.5 cm from the end of the bend protection.
CaretText
 mariner 3S clubliner Servicing 76 (84)
- Remove the rollers
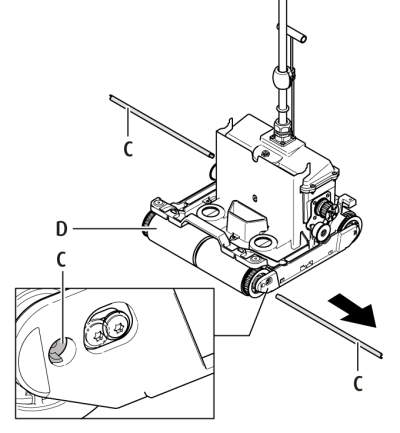

 Pull out roller axle (C). To do this, press the opposite end of the roller axle in the direction of the centre of the appliance using a screwdriver. The complete rollers (D) can now be removed/replaced.
CaretText
CaretText
Pull out roller axle (C). To do this, press the opposite end of the roller axle in the direction of the centre of the appliance using a screwdriver. The complete rollers (D) can now be removed/replaced.
CaretText
CaretText
- Install rollers
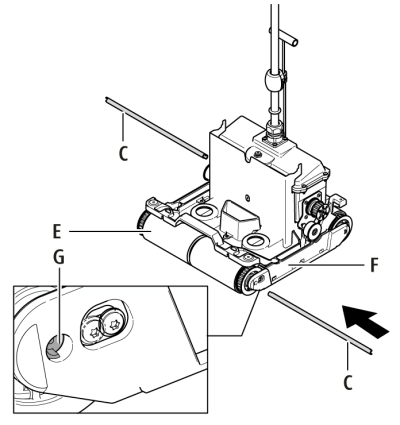
 Position new rollers (E) between the lateral guides (F) and insert axle (C).
CaretText
Position new rollers (E) between the lateral guides (F) and insert axle (C).
CaretText
 Rotate axle so that the milled recess is on the side of the anti-twist lock (G).
CaretText
Rotate axle so that the milled recess is on the side of the anti-twist lock (G).
CaretText
- Flap in the anti-twist lock
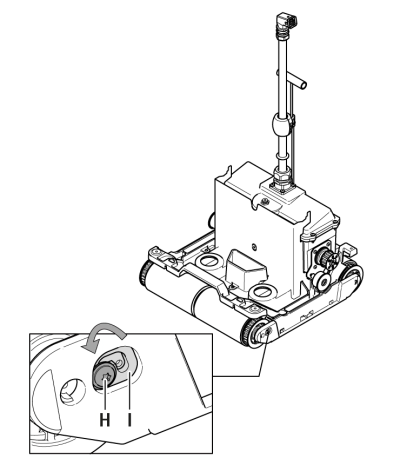
 Pivot in the anti-twist lock along the track on the guide plate (I).
CaretText
Pivot in the anti-twist lock along the track on the guide plate (I).
CaretText
 Tighten the anti-twist lock screw (H).
CaretText
Tighten the anti-twist lock screw (H).
CaretText
 mariner 3S clubliner Servicing 78 (84)

Decommissioning

 mariner 3S clubliner Decommissioning 81 (84)
Returning the product The authorised representative will take back the used appliance for free recycling. This rule applies in particular in the EU region. Transport costs will be at the expense of the customer. Recycling Your product has been designed and manufactured with high-quality materials and components, most of which can be recycled.
 mariner 3S clubliner Decommissioning 82 (84)

Spare parts

 mariner 3S clubliner Spare parts 83 (84)
EN_Mariner_3Sclubliner+_clubliner_plus_Manual_V4.0-cleaned96dpi